Sunday, July 24, 2011

Hope Chest

More progress.  Mostly baby steps.  I'm still looking at it as if I'm eating the elephant...one bite at a time.  It was 103f today.  It's 8:30 at night, and its still 98f.

The entire stock of hardwood has been rough cut to size.  These pieces will require more work to create the mortises and tenons.  But the hard part is done.  On too some planing/jointing/mortising/tenoning/sanding. Ugh, maybe the hard part isn't done.  :)

I noticed one unfortunate problem with my $120 portable table saw.  The metal insert isn't flush with the table.  When cutting 45 degree angles, this causes my smaller pieces to be cut narrower then planned, as they dropped down a bit.  You can also see that the top is not wearing very well.  More reason to invest in a 6car garage so I can have a real solid all metal top cabinetry table saw.  So instead of $120.oo, I'll need about $300,000.oo for a new house and $3,000 for the table saw.  $303,000 or $120?  I'll make do I suppose.  Time to shim it (and it wouldn't hurt to make a zero clearance plate too) and maybe wax the table top or something.

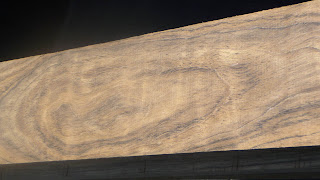
I just love this hardwood.  I took some scrap and added some clear semi-gloss...oh my, it's got serious character with amazing gold bands of quilt that you just cant see on the unfinished wood.
I should also mention that this stuff is insanely heavy.  We may not be able to move this chest (empty) once it's completed.  Time to think about rigging it with those rubber roller blade wheels. Maybe an electric motor and a steering wheel too.

Thanks for reading.

Sunday, July 10, 2011

Hope Chest: Man was it hot today.

I didn't get a chance to get out into the garage today until 3pm... my word was it hot.
The good news is I started working on the frame bits.  So I started with the vertical pieces.  I need 16 of them.
Perfect.  And precise.
 So, I am going to spline the corners together using some of the cedar board, cut into strips.  So I setup the router table.  I'm not 100% sure the is the right way to go.  I'm also clearly missing the router disc thing that prevents the wood from chipping.  I can tell you, even using a nice long push board (6" of it sits flush on the work piece and has a handle that sticks out),  It just feels terribly dangerous.  I was able to replicate passes though.  It was hot enough that I decided to stop for the day.  Dizzy/tired/hot/sweaty probably isn't a good thing when dealing with router tables.  Or beer pong.
 My setup, a bigger world view with my scrap piece...
Still in good spirits... the only major error I made was not taking into account the vertical pieces of the lid.  It sure would have been nice to consider that so that the grains match from top to bottom.  I'm here to learn and make mistakes.  Or vice versus.  I even knew better.  Had even thought about it in advance... but boy, was it hot.  That's my excuse and I'm sticking to it (it's so hot, the excuse is even sticking to me).


Hope Chests...

Ok, so the main panels have been planed, jointed, and cut to length.  Every board is within a 1/16" in length, 1/32 in width, and a 1/32 in thickness.

I have it stacked just to make sure it dries out real well.  The wood is Cedar Fence Pickets.  It looked horrible when I bought it.  But once planed, they really look fantastic.  Nice and light too. 
What's next is creating the frame of the hope chests out of Sedua hardwood.
Here's the hardwood.  I love the figure, color, and the hint of quilt...
Another shot, more accurate in colors and contrast...

Thursday, July 7, 2011

Quick Update...

Just thought I'd update.  I got a chance to use the 13" planer and planed through about 25 boards (cedar fence post) front and back.
What I like a LOT is that the dust collector sings.  It doesn't make noise or anything, but it just works SO well.  I know it's time to empty the trash can when the clear bag on the dust collector itself starts seeing chips. (you can kind of hear them clunking around the empty bag).
I went through two full garbage cans full of chips...  
The whole thing worked like a champ... very happy.


Strangely, this started to happen.  I'm  thinking it was related to the 101f-103f temperatures I was dealing with.  I took the time to shut it down and clean out the tubes/inlets/etc and they were all 10)% clear.  I'll be keeping an eye on this phenomena as I continue working with this stuff called wood...
All told, after cutting up my planed, jointed, and ripped boards, I discovered I was 4 boards short. :(  Oh well, it shouldn't be too bad to get them in the same configuration as the others...

Saturday, June 25, 2011

I finished up the Jointer today.

The pictures aren't that great, I apologize.  On a side, I even used a tripod.  But I learned that I cannot press the button on the camera with out jiggling it just a bit.  So, off to Amazon to buy a wireless clicker-ee-doo thing.

So, here she is in all her glory.  I wish I could find what year this was made in.  Regardless, it works quite well.  It will need some attention in places, but then again, maybe it's my technique that requires the attention.

 I tried resurfacing the deck, but it really didn't need it.  So it was mostly a thorough and full cleaning, followed by a bit of lubricant to free up some adjustable bits.  I was even able to zero out the depth gauge perfectly.  I hope it sticks. :)
 Same for the fence angle... nailed it perfectly at 90degrees.  Again, I hope it sticks.  I'll always check it though just to ensure it's right before each use (that's my machinists square pressed up against the fence... no light.  always a good thing).
I finished up by running a bunch of cedar through it.  Then put the cedar through the 13" planer, followed by ripping them on the table saw... this is too much fun, with just  a taste of 'work'.

PS, Whats really nice is that I was able to retrofit my dust collector to all the tools, and only had a little clean up to do!

Thanks for reading, hopefully I'll start posting hope chest updates soon...

Tuesday, June 21, 2011

June 20, 2011 update.

Hi.
I haven't been up to many (or any) garage projects lately.  But I have set my number one garage priority project to be the two hope chests for the girls.  I have the plans.  I have the hardwoods.  I have the softwoods.  And I have the veneers.  I just haven't had time.

So tonight, I decided to get started.  But that means, fixing things.

I was so fortunate to receive an older Craftsman jointer from my Uncle Mike.  I believe it was his fathers, which makes it my grandfathers.  Pretty cool!  However, during transport, the on/off switch broke (cast metal).  So I went ahead and worked on wiring in a 20amp switch and a new chord.  While going over the jointer, I realized that I didn't know how to use it. (turns out, everything is kind of siezed together).  Thanks to the internet, I came across the users manual. Craftsman 4-3/8" Jointer instructions.

So I have decided to spend an evening or two completely going through it and making sure it's clean, functional, and silky smooth.  I plan to refinish it too.  Total expense should be less then $10.oo for a can of hammerite gray paint.

So here are the before pictures.


Sunday, April 17, 2011

The two stage dust collector.

This is related to another earlier project;
Back to Basics and
Dust Collector Update
( I still need to calculate the final costs, but it was in the neighborhood of $120 in bits and pieces.)

I some how managed to complete this after or family Tea with Bunny and Me event Saturday, but didn't get to pull it out and try it until this morning.  Overall, I'm veyry happy with how it works.  I miss calculated the height of the contraption, however, it doesn't take anymore floor space then the original single stage dust collector.  I just have to fitz with it if I want to take it out of the garage. (disconnect a hose and remove the trash can.)
On wheels, out and raring to go.  4" hose intact.  All the dust and debris collect in the trash can, leaving the filter dirt and dust free for a LONG life.  Best of all, I can use it like a regular vacuum cleaner and vacuum dirt, leaves, sticks, etc with out worry of damaging the vacuum impeller system.  Go me.  Or is it Ghetto Me??

Stows neatly on the far wall and can be pulled out pretty easily.
Hopefully I'll update more later, such as adding a bunch of over head feeds and branches.  It may also be a pipe dream, and I should stay portable.

Sunday, April 10, 2011

The Garage

This, is my garage.  My workspace.  My intent is to use it for woodworking and automotive work.
The following posts are just to update the blog with where we're at here in our home.

Simple, easy lighting for workbench projects.

Every single socket that sears sells.  That's a lot of trips to sears.

All lit up with plenty of organized storage.

Just looking around.

Portable airconditioner, and my 1930's-1940's Crafstman Joiner!

White wall with lots of white board.

MMMMmmmm lighting.


Busy busy busy.


Murphy Bench

I LOVE my workbench, but sometimes, its great to have more work space.
So I thought a murphy style work bench would be great.  It stores to only 3" thick, up against the wall.

Stowed!

Locked

Lowest Level, for lawn mower work?  I don't know, but I've got it!

This has been a very handy height for reworking furniture, etc.

This is WAY high.  Perfect for my height!

Overhead Storage!

I was running out of storage.  And being that we have a two car garage that stores two cars, I had to get it off the floor.  So, I thought this would be a good idea.

Overhead, double garage storage

Drops down and holds in place.

Both down.

Stuff

More Stuff

Tucks in neatly to clear the mountain bike.

Garage door OPEN.  Everything tucked up behind it.

Bed Project

Since I refinished all of our 'donated' bedroom furniture, we needed a bed to match the style and material.  So I designed and built this thing over a period of months.

Test Assembly, just to check it out.  That's black iron pipe for the risers, painted with hammerite paint.
Mortise and Tenon made with a hammer and screwdriver. Ok, maybe not that archaic, but darn near!

Details of the bolts holdint it all together, and the foot detail. 
The foot detail matches the rest of the bedroom furnitures foot details.

Test fitted before finishing.

Stealing design cues from the other furniture in the room.

It's IN!  And it Matches!

Mod 1.0.  It was tough to sit up at night, especially with a pregnent wife, so I made this back board to support us.  It's made from very similar curtain material as our actual curtains.  It matches surpisingly well!

Detail of how I put a bit of angle on it.  It works!!

Garage Picture Frames

I received a lot of requests from friends on how I did my picture frames in the garage.  It's pretty simple.  A piece of lexan I cut to fit, some conduit clamps, some conduit, and some 90' conduit fittings.  Easy.  Cheap.  And completely redneck. :)

Pictors!

Messy, but functional.

Portable Cabinet Saw

I wanted to have a cabintery table saw, but knew I couldn't (or wanted to) fit it into my two car garage. 

So I came up with an idea that would allow me to use it as a cabinetry table saw but break down to be portable and can be stored away.

Put it all together.

Test fit.  What you might be able to see is that it;'s all assembled with wing nuts.
It is also fully triangulated to prevent rocking.

The two door panels are cored out to allow me to spline to tops together.

More splines.

Done!